如何把借阅手册的内容录入电子系统
背景描述:
如今一些乡村、城镇学校,在教室设置了图书角以方便学生阅读。部分学校为了了解学生的借阅情况,要求先把借阅信息记录在册,然后再统一录入到学校的电子借阅系统。这是一个比较特殊的场景—-我们知道在图书馆场景下借阅信息在借还活动过程中就录入系统了,中间不存在手册记录的环节。为了响应学校需求,益迪团队从手册设计、程序设计等方面进行了探索。
手册设计
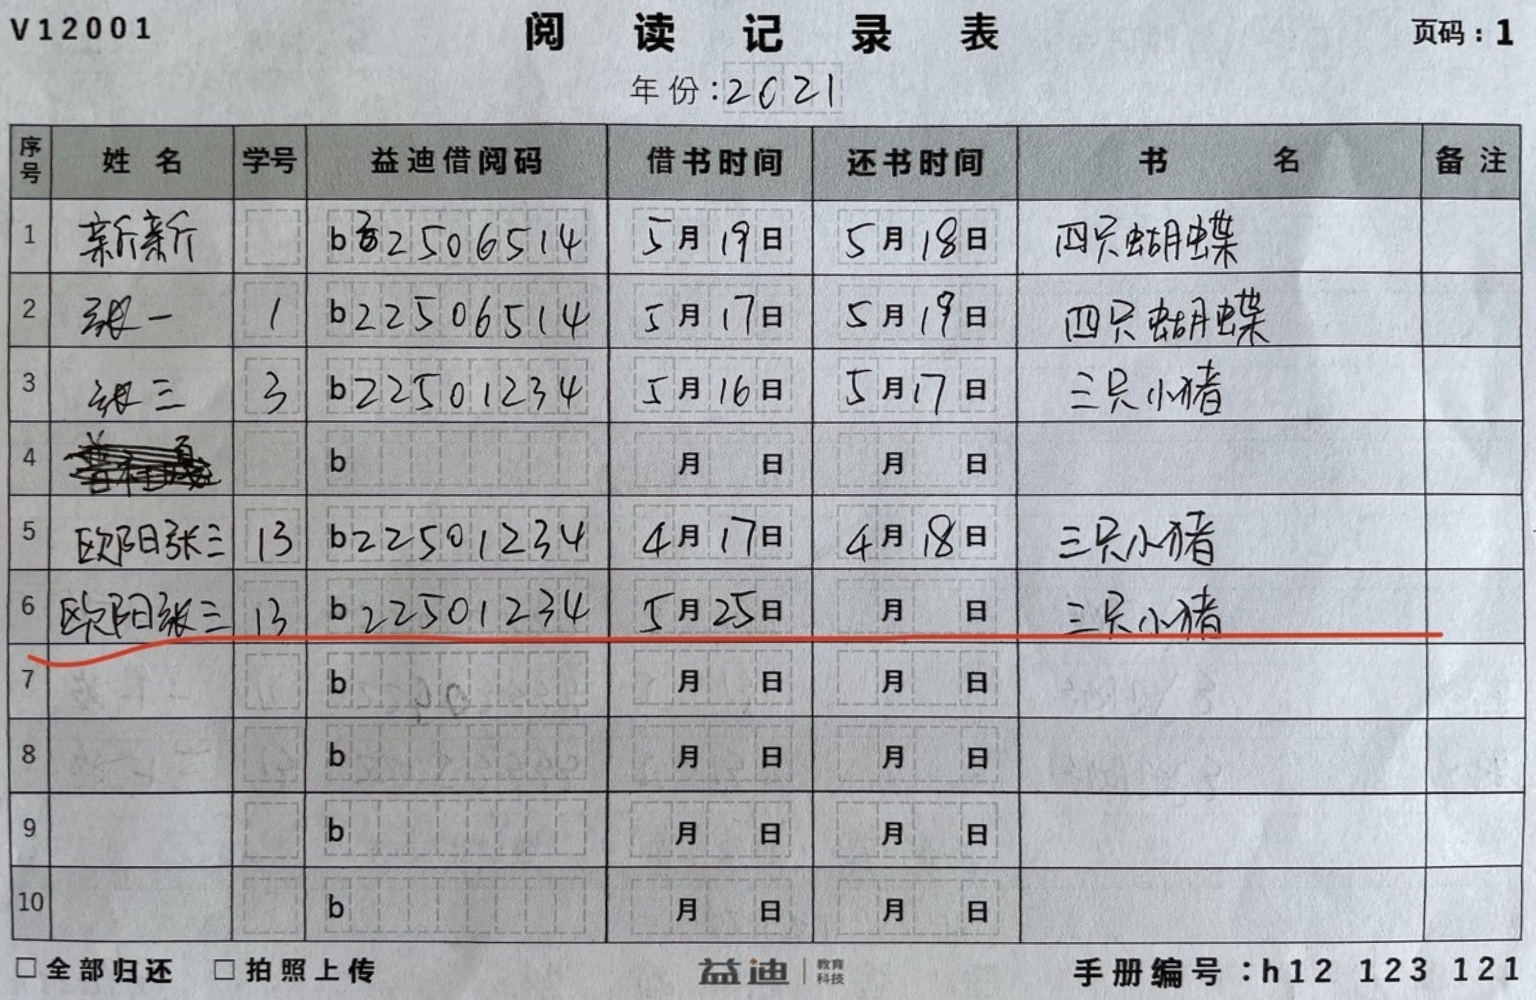
手册设计和程序设计是方案设计的两个方面,实际的设计过程也是这两个方面不断融合的过程。在起始阶段,手册是独立设计的,然后根据手册的特点去写程序,第一版手册如图所示
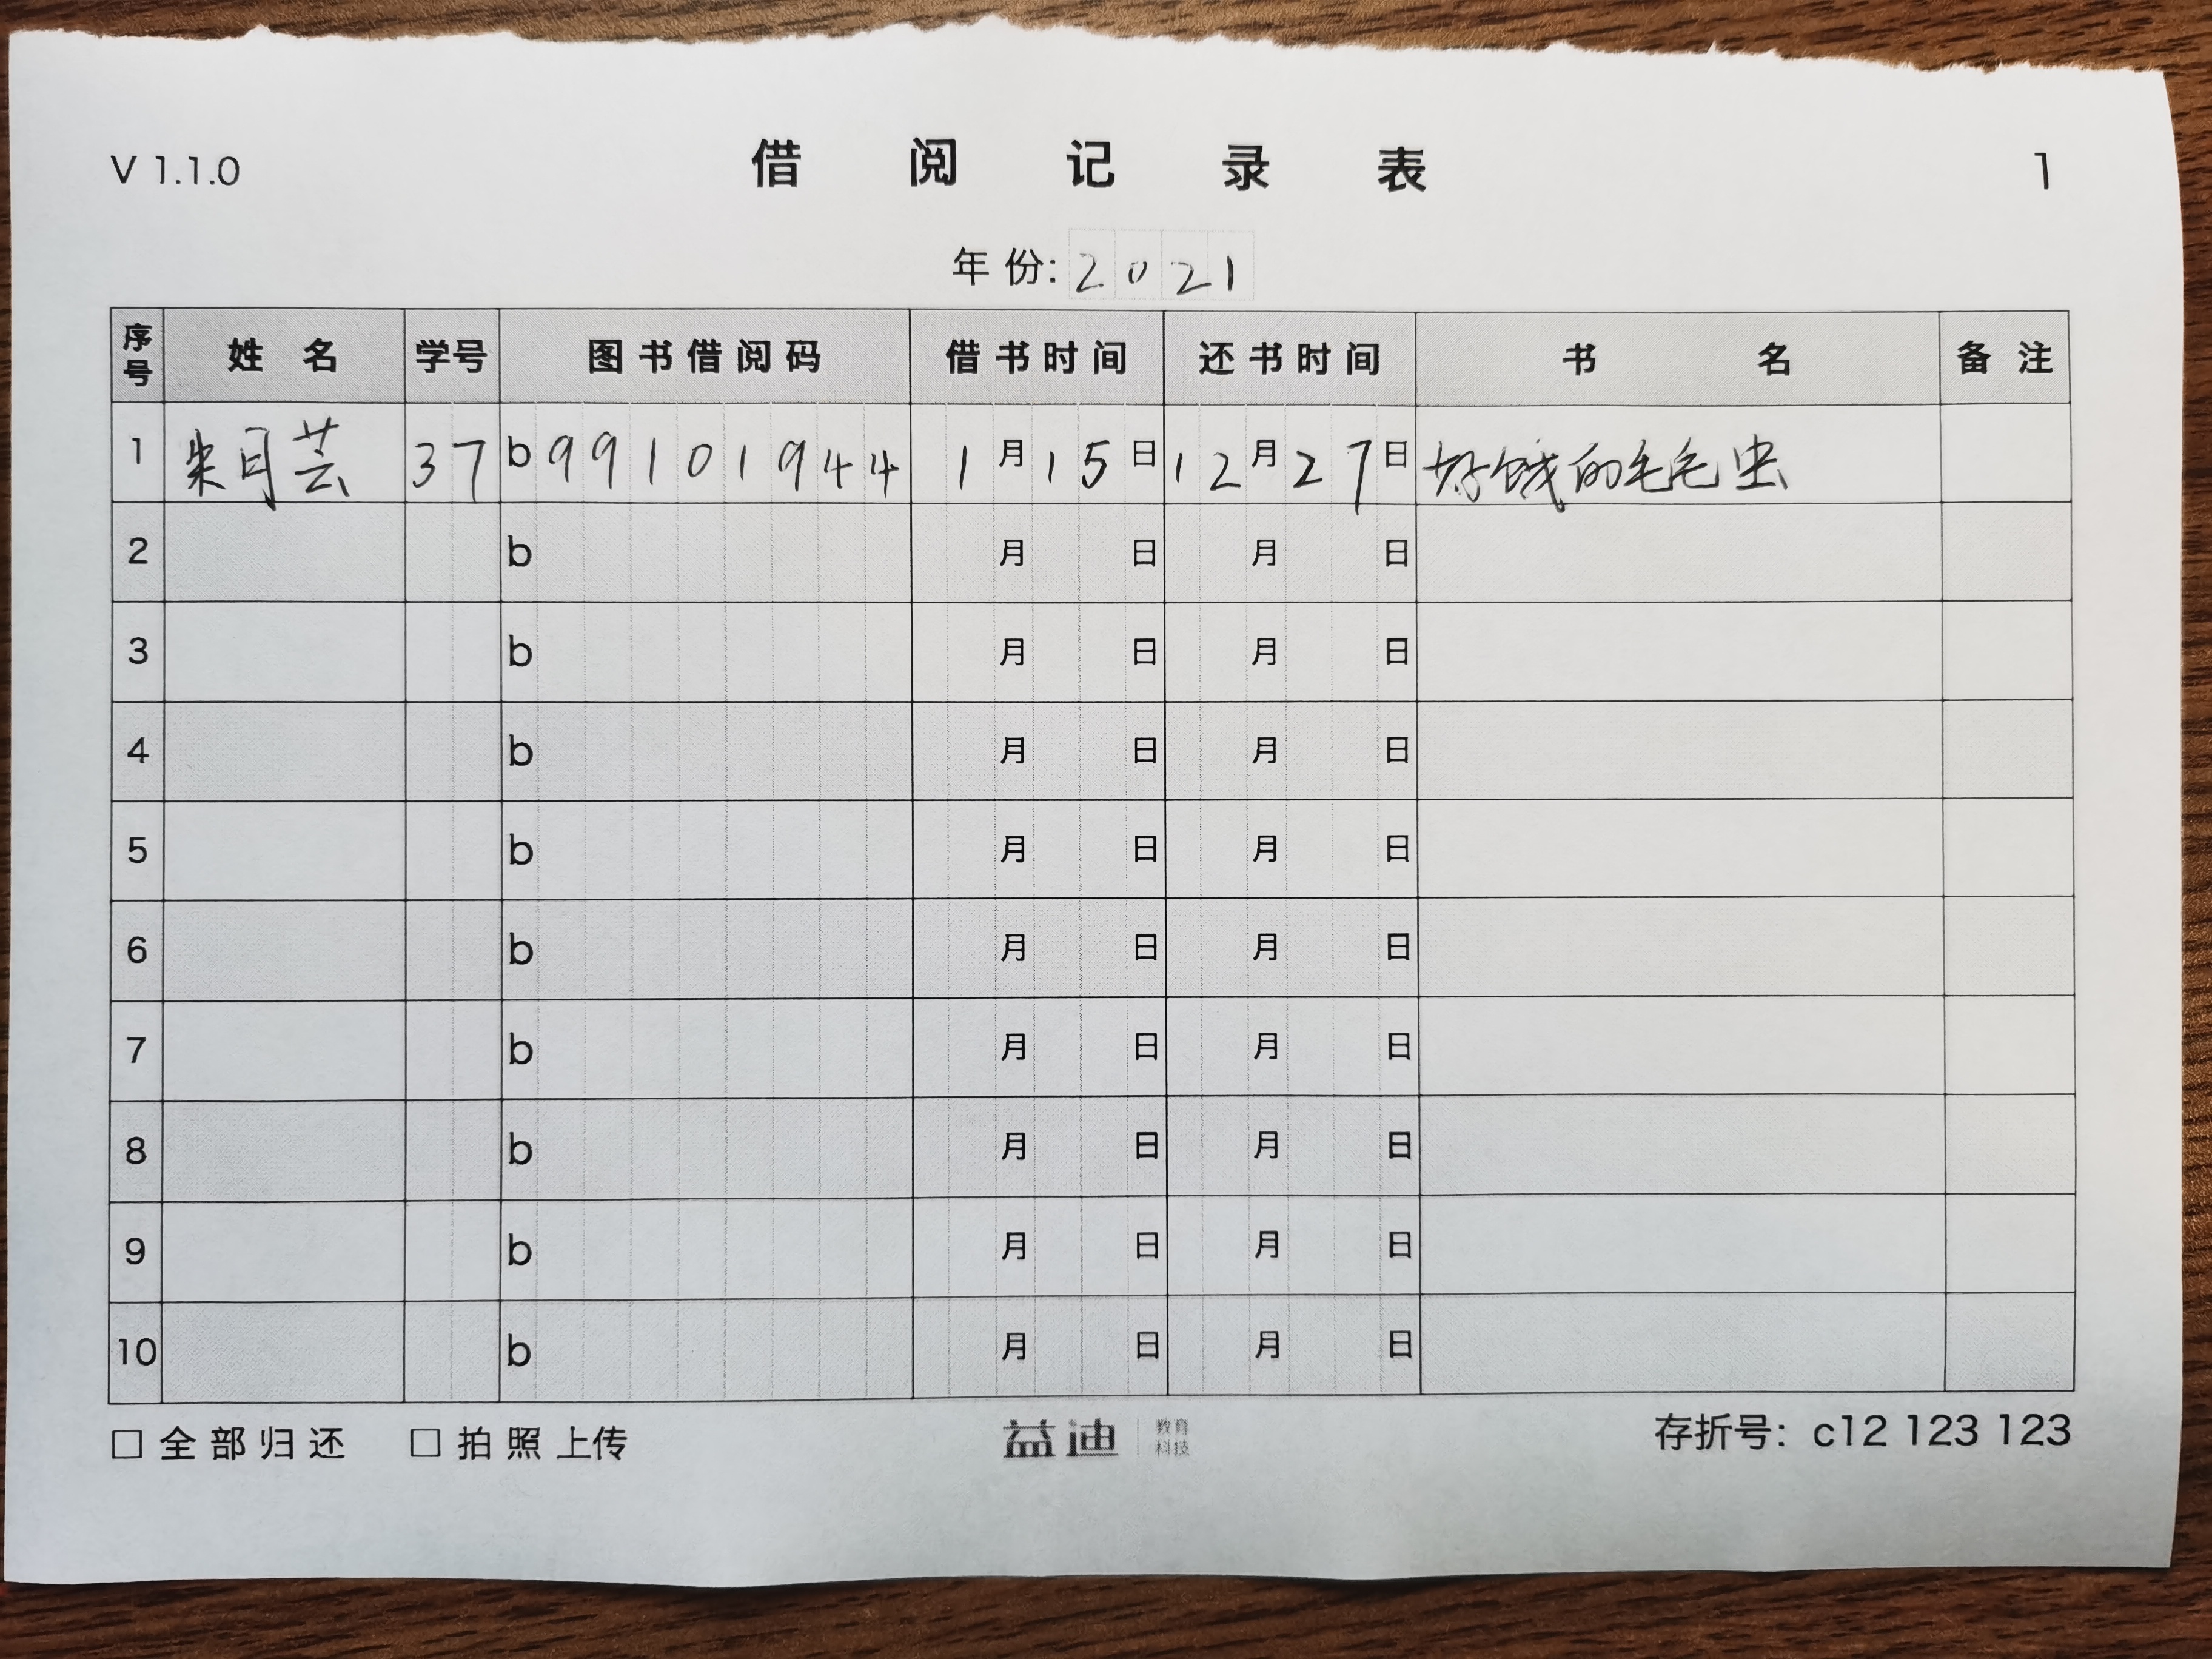
该版的识别效果比较一般,主要原因是受用户拍摄角度和距离的影响。手写文字识别已经有比较成熟的商业化方案可供选择,只需要保证输入照片的质量然后就可得到满意的识别结果。因此用户拍摄方式的不确定性必然影响文字识别率。另一个问题是难以对手册的内容进行定位。产品需要给用户提供比较方便的校正识别结果的功能,如图所示
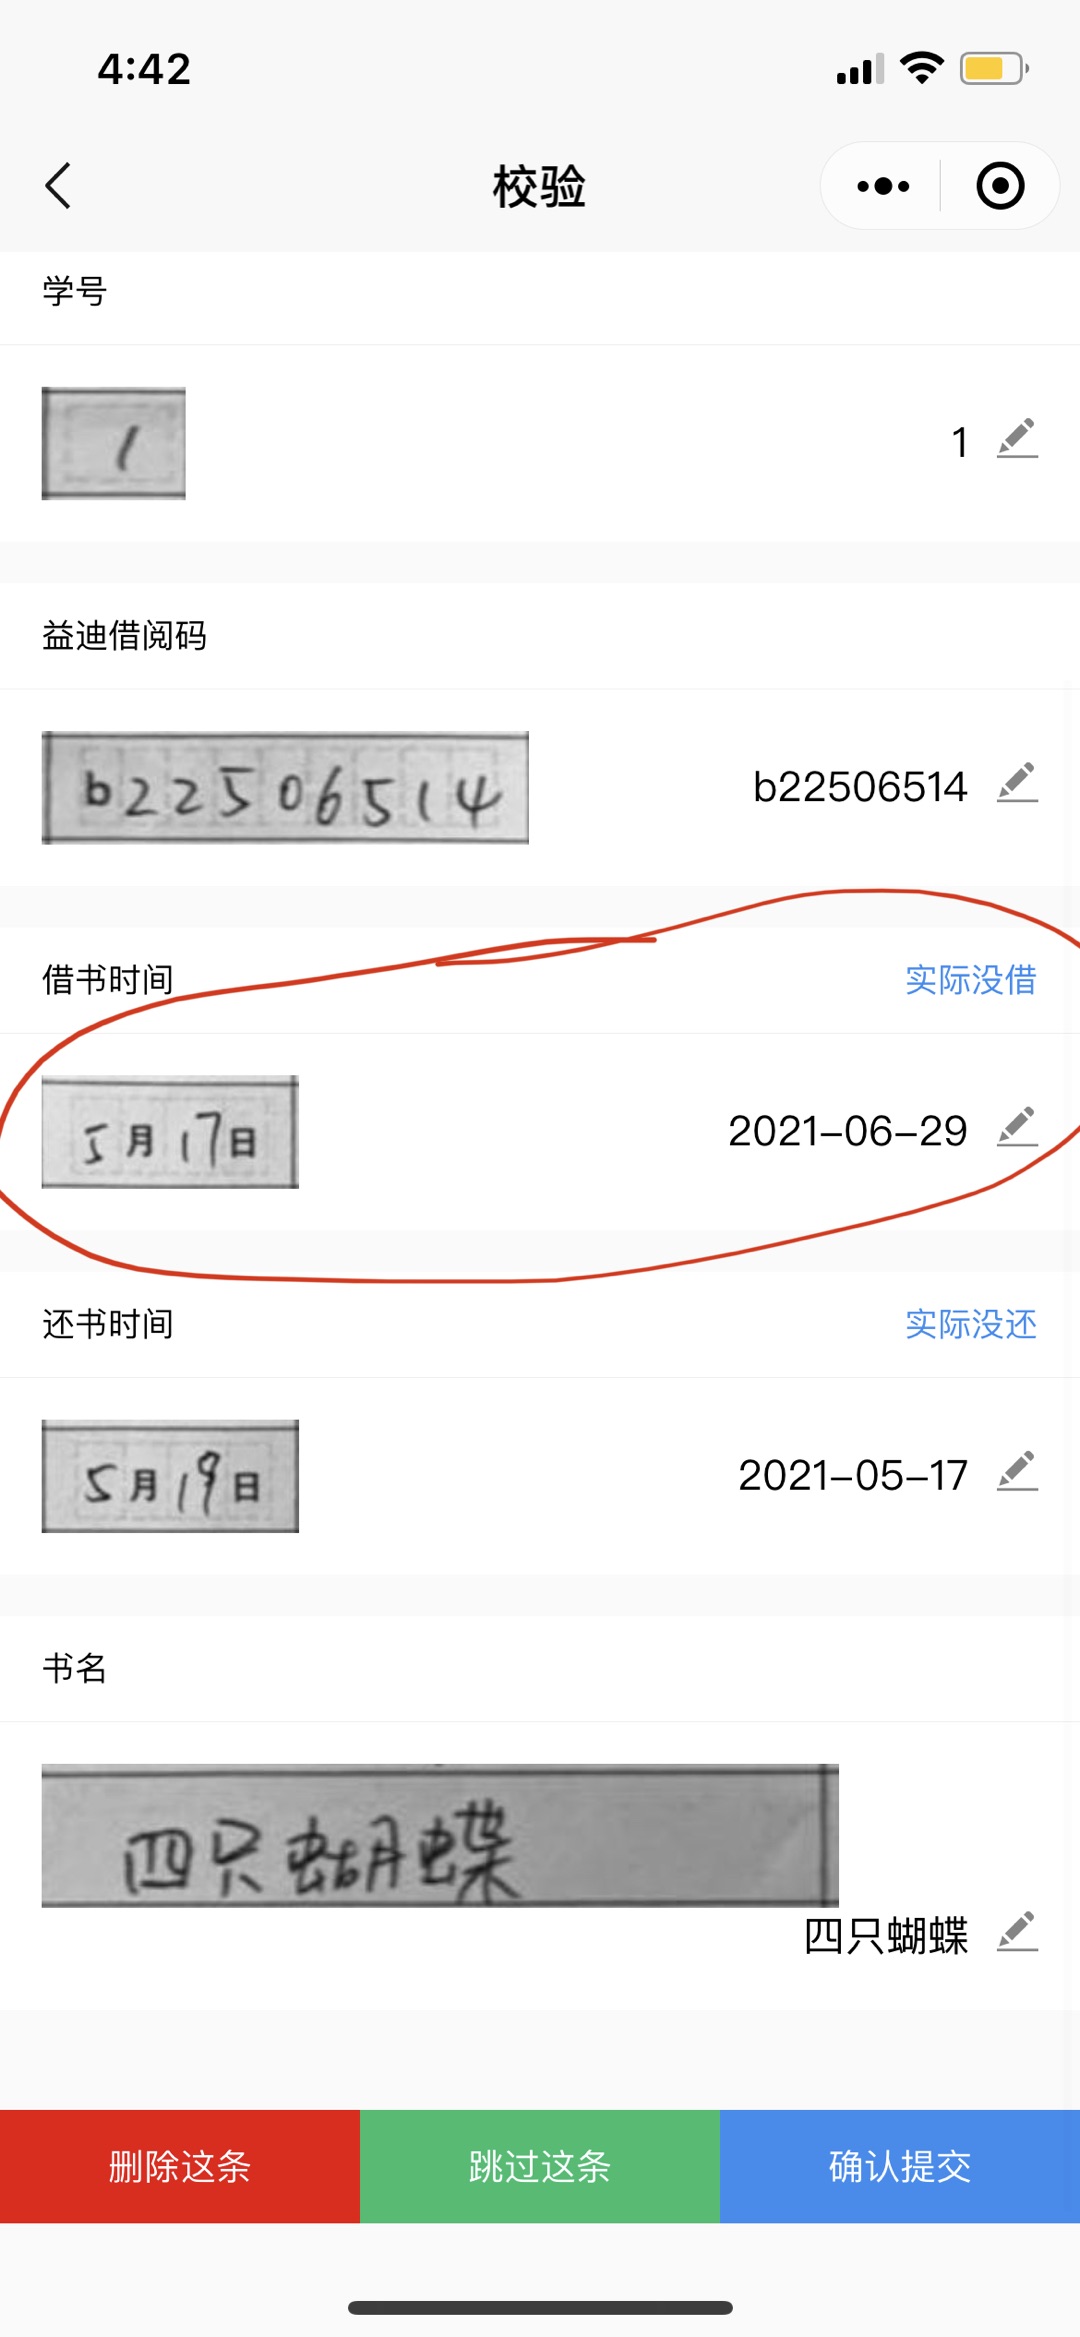
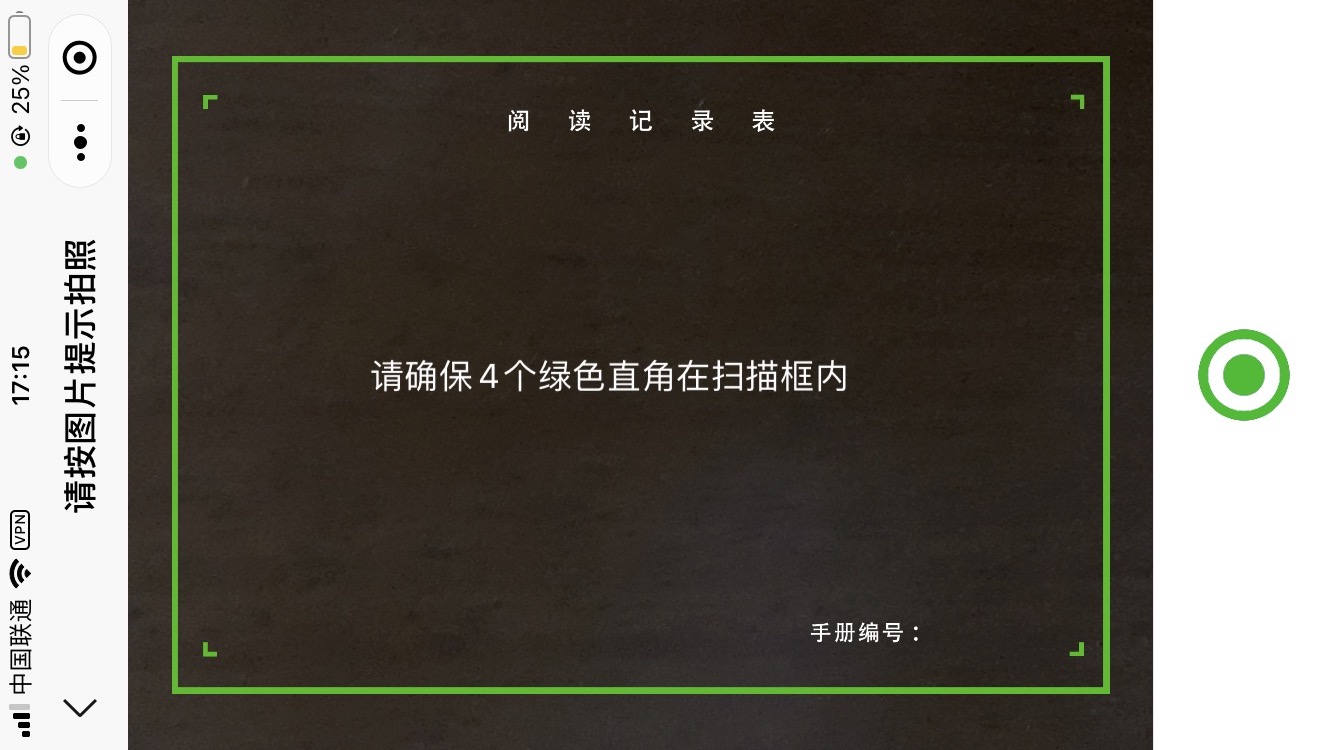
这一设计是为了配合程序以达到内容定位的目的。大致思路是通过分离绿色得到四个标记在图片中的坐标,再根据透视原理将四个坐标还原成 大小固定的矩形,按照这个矩形剪切照片。由于表格的大小和相对位置都是比较确定的,表格单元的位置也就比较确定了。
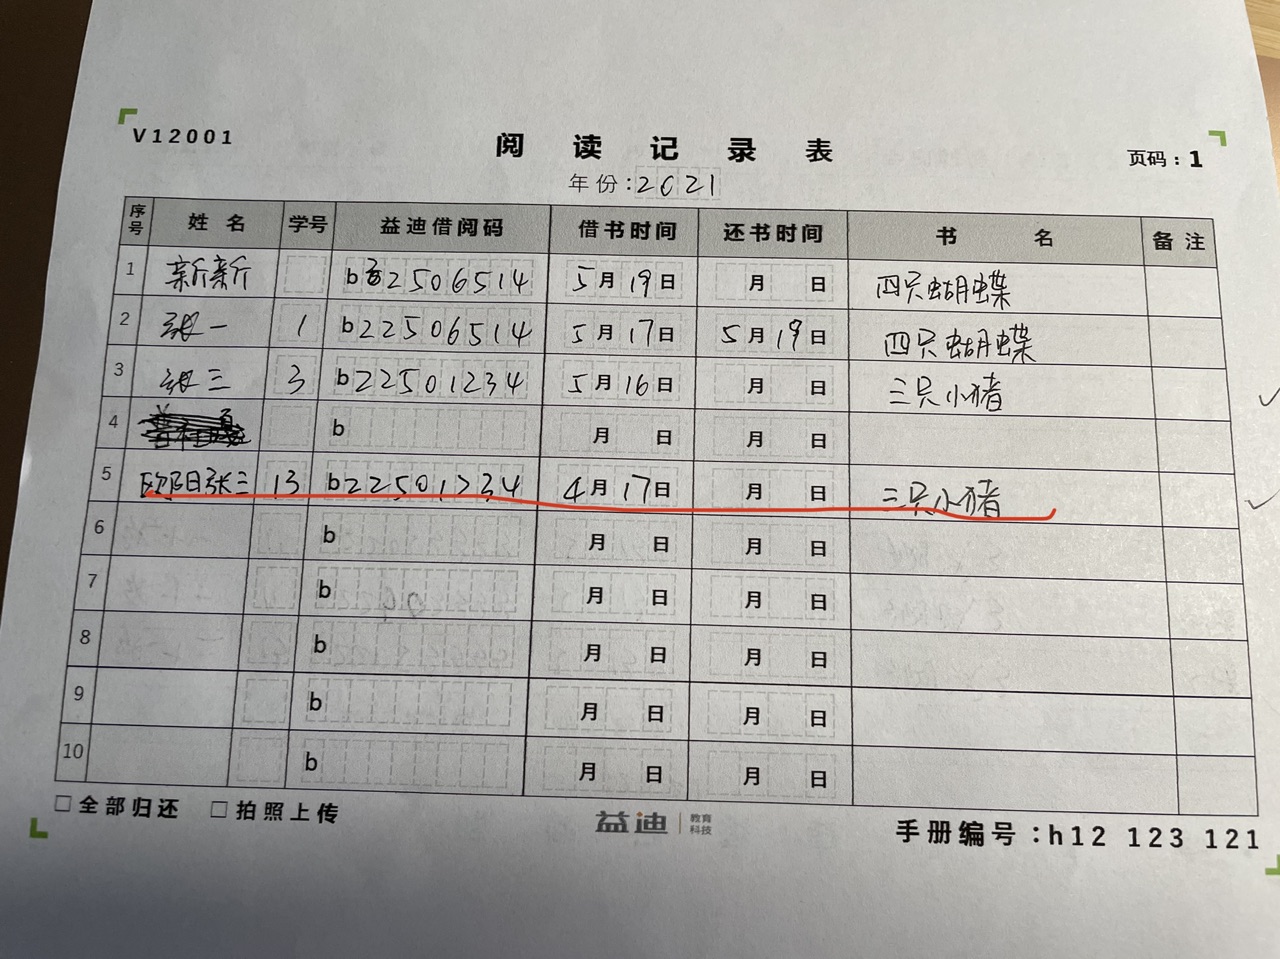
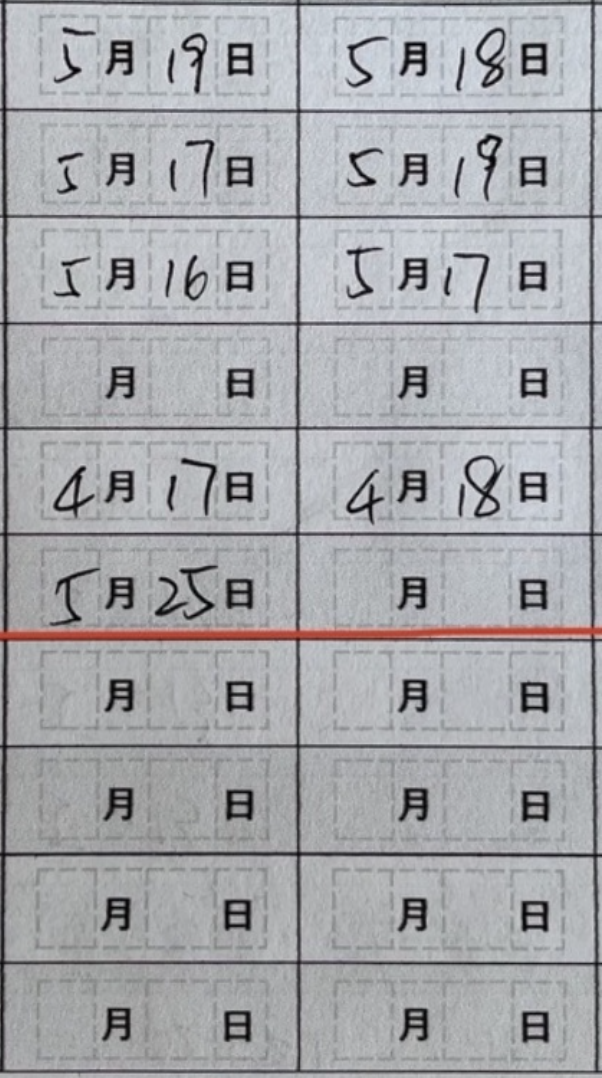
仔细观察,还可以发现手册中学号、借阅码、日期设计了虚线方格,这是为了引导用户更加紧凑地填写内容,方便文字识别模块把单元格的内容视为一个整体。
到这里整体的识别效果已有很大的提升,除了借书、还书日期外其它列的平均识别率达到 90%。针对日期识别的短板,可以截取手册中的日期内容单独识别
另一个需要优化的点是加强对手册标记的识别和筛选,这至关重要,因为识别标记是截图的关键。因此对标记作如下修改
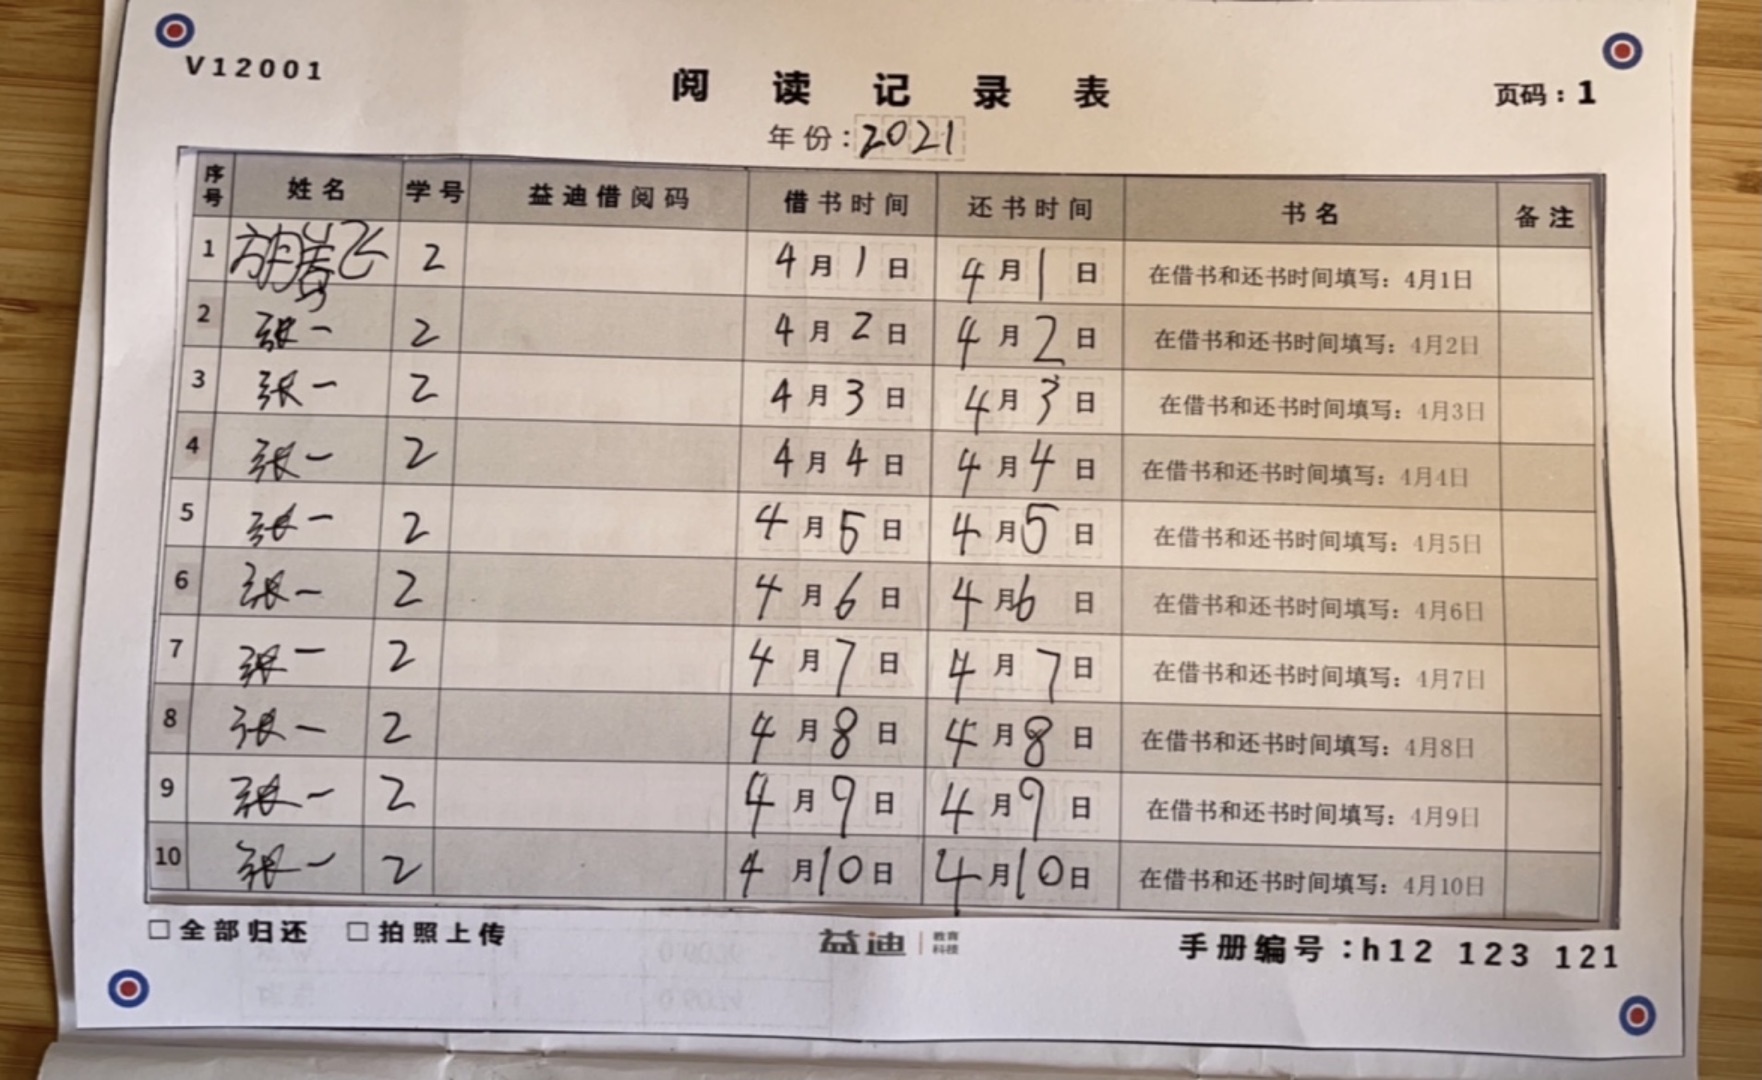
即由绿色折块变成红蓝同心圆。大致思路是先识别红、蓝标记得到红蓝的一组坐标(在没有干扰的条件下会有 4 个坐标,实际测试过程中一般会大于 4 个),再在根据蓝圆中必定包含一个红圆这一特征把正确的 4 个坐标筛选出来。关于标记颜色的选择一般选用三原色。绿色的好处是绿色的笔很少见,这样可以避免填写的内容与标记撞色而造成干扰;后面采用了红蓝,据说是因为这两个颜色比较好搭配,你看很多国家的国旗都用到了这两个颜色。
程序设计
透视法截取图片
imageprocessing.py

import cv2
import time
import numpy as np


def perspective(img_stream):
    originImg = cv2.imdecode(np.frombuffer(img_stream.read(), np.uint8), 1)

    hsv = cv2.cvtColor(originImg, cv2.COLOR_BGR2HSV)
    redMask1 = cv2.inRange(hsv, (0, 50, 20), (10, 255, 255))
    redMask2 = cv2.inRange(hsv, (170, 50, 20), (180, 255, 255))
    redMask = cv2.bitwise_or(redMask1, redMask2)
    redContours, _ = cv2.findContours(redMask, cv2.RETR_EXTERNAL, cv2.CHAIN_APPROX_SIMPLE)

    blueMask = cv2.inRange(hsv, (100, 50, 20), (140, 255, 255))
    blueContours, _ = cv2.findContours(blueMask, cv2.RETR_EXTERNAL, cv2.CHAIN_APPROX_SIMPLE)

    # originImg = cv2.drawContours(originImg, redContours, -1, (0, 0, 0), 1)
    # cv2.imshow('drawimg', originImg)
    # cv2.waitKey(0)
    # cv2.destroyAllWindows()
    # return

    ratio = 0.8
    blueR = 10
    redR = 4
    blueCircles, redCircles = [], []
    for cnt in blueContours:
        (_, (w, h), _) = cv2.minAreaRect(cnt)
        if w > 0 and ratio < h / w < 1 / ratio:
            (a, b), r = cv2.minEnclosingCircle(cnt)
            if r > blueR:
                blueCircles.append((a, b, r))

    for cnt in redContours:
        (_, (w, h), _) = cv2.minAreaRect(cnt)
        if w > 0 and ratio < h / w < 1 / ratio:
            (a, b), r = cv2.minEnclosingCircle(cnt)
            if redR < r < blueR:
                redCircles.append((a, b, r))

    y = 1536
    x = 1000
    coordinates = np.zeros((4, 2))
    for c in blueCircles:
        (a, b, r) = c
        if a < x / 2 and b < y / 2:
            if len(blueCircles) == 4:
                coordinates[0] = [a, b]
                continue
            for c2 in redCircles:
                (a2, b2, r2) = c2
                if a2 < x / 2 and b2 < y / 2 and (a - a2) ** 2 + (b - b2) ** 2 < 0.25 * r2 ** 2:
                    coordinates[0] = [a, b]

        if a > x / 2 and b < y / 2:
            if len(blueCircles) == 4:
                coordinates[1] = [a, b]
                continue
            for c2 in redCircles:
                (a2, b2, r2) = c2
                if a2 > x / 2 and b2 < y / 2 and (a - a2) ** 2 + (b - b2) ** 2 < 0.25 * r2 ** 2:
                    coordinates[1] = [a, b]

        if a < x / 2 and b > y / 2:
            if len(blueCircles) == 4:
                coordinates[2] = [a, b]
                continue
            for c2 in redCircles:
                (a2, b2, r2) = c2
                if a2 < x / 2 and b2 > y / 2 and (a - a2) ** 2 + (b - b2) ** 2 < 0.25 * r2 ** 2:
                    coordinates[2] = [a, b]

        if a > x / 2 and b > y / 2:
            if len(blueCircles) == 4:
                coordinates[3] = [a, b]
                continue
            for c2 in redCircles:
                (a2, b2, r2) = c2
                if a2 > x / 2 and b2 > y / 2 and (a - a2) ** 2 + (b - b2) ** 2 < 0.25 * r2 ** 2:
                    coordinates[3] = [a, b]

    pts1 = np.float32(coordinates)
    pts2 = np.float32([[0, 0], [x, 0], [0, y], [x, y]])
    M = cv2.getPerspectiveTransform(pts1, pts2)
    processedImg = cv2.warpPerspective(originImg, M, (x, y))

    # rotate
    processedImg = cv2.rotate(processedImg, cv2.ROTATE_90_COUNTERCLOCKWISE)

    # gray scale
    # processedImg = cv2.cvtColor(processedImg, cv2.COLOR_BGR2GRAY)

    return cv2.imencode(".jpg", processedImg)[1].tobytes()
API
main.py

import io
from flask import Flask, request
from imageprocessing import perspective

app = Flask(__name__)

@app.route("/image", methods=["POST"])
def handle():
    stream = io.BytesIO(request.data)
    imgBytes = perspective(stream)
    return imgBytes
执行
run.sh

export FLASK_APP=main.py
flask run